After last weekend's image transfer workshop, I wanted to use the techniques I'd learned, so I found some nice copyright free images, and went to Osbornes to have them copied. I've applied them to fabric, and they're drying upstairs.


After last weekend's image transfer workshop, I wanted to use the techniques I'd learned, so I found some nice copyright free images, and went to Osbornes to have them copied. I've applied them to fabric, and they're drying upstairs.


I've been working on my webs and wheels hoopla on and off for a couple of weeks, and I'm really happy with how it's turning out. I've experimented with quite a few variations, including size, spoke numbers,, thread type, and especially satisfyingly, working both webs and wheels with two strands simultaneously. The two colour wheels are lovely, and the webs look like flowers - I want to work one in reds to look like a rose.
I'm now stitching simple meandering lines of chain stitch over, under and around the wheels, to ground them a bit, and hopefully add to the organic feeling that I'm getting from the embroidery.
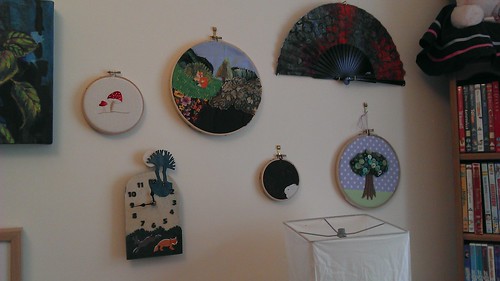
Guild are planning to pick a different stitch every month, and I think I'll work my pieces up as hooplas, so that I can display them in my house, and still have samplers to refer to for future work.

I started this little piece in our members session about web and wheel stitches yesterday, and I'm pleased with how it's going so far. I plan to shade it through brown into green, filling the hoop with big chunky wheels, scattering delicate ones in between them, and then snaking chain and wheatear stitches through the gaps.

Last night at guild I purchased this beautiful bundle of embroidery threads. A former member had sadly passed away, and her daughters brought all her textile books and supplies down for us. I picked up the threads, and an Islamic pattern book, which looks to be very inspirational.
I'm using the threads to do a webs and wheels hoopla, which I started in the members session yesterday.

Last night and the night before, I got the wool fibres out, and made more felt. I'm visiting my family this weekend, and my nieces love Sewing, so we're going to turn this felt into pictures for their walls.


I knitted a pair of my Treat Mittens in a lovely autumnal colourway for my friend Sue for Christmas. I really like knitting this pattern, and I was pleased with how they turned out.


Another Christmas knit - I made this little slug using cheezombie's pattern for Simon's brother. It was good fun to knit, with an interesting technique for the eye stalks.

For my older nephew, I made a Gruber monster, based on a pattern from Molly Makes. I changed the colours a bit, and added a belly button, which I made deep by stitching securely through felt and wadding, to sculpt the body more.
It was really very enjoyable to sew, all handstitched in mostly blanket stitch, and came together surprisingly quickly. It went down well on Christmas day too.
I only have an in progress photo, I'll post more photos when I've uploaded them.

This Christmas I knitted a Teddy using the Baby Bear pattern from Itty Bitty Toys by Susan B. Anderson.
I knitted it with some lovely, squishy yarn that mum and I had dyed in bright colours a couple of years ago. The pattern was an easy, quick knit, with the only real tricky bits being getting good placement of the limbs and facial features.
I think it worked out well, and my nephew liked it!


I'm having a bit of a catch up on things I've made but not blogged about.
I spent a lovely day at New Year while cat sitting for friends working on some embroideries using techniques I picked up in a workshop with Margaret Beal.
I used the same technique to do both the presents (for a Birmingham Embroiderers' Guild Christmas pennant) and the window piece, except that the window has stitched outlines.
The pieces are worked on a base of acrylic felt, with layers of polyester organza on top. The soldering iron is used to make marks into the layers, both freehand and along a metal ruler. With care, the top layer can also be removed, revealing the colours below, and allowing for further mark making.
The window had an outline square and free-machined lines inside, forming spaces to work within, rather like zentangling.
It was a lovely process, very easy to get 'flow'. The only thing to be aware of is the risk of burning from the soldering iron.


I've been using zip lock freezer bags to store my current and upcoming embroidery projects, and they look so appealing, all packaged up ready to stitch.
I'm off to give blood tonight, and even with an appointment there's usually a long wait, so I thought I'd package up these projects to give me something to do while I wait.

I'm working on the second embroidery in my elements series, Earth, which is lots of strong lines on a handmade green and brown felt background.
I've been enjoying looking up stitches in my lovely new-to-me 1946 edition of Mary Thomas's Dictionary of Embroidery Stitches which I bought for £5 in Stratford over Easter. Discovering new stitches is very satisfying.
This evening, I picked out Portuguese Knotted Stem Stitch, which takes a bit of thinking, but is very attractive when worked in cotton Perle. It is the green line in the photo, with some square chain stitch above and knotted chain stitch below.

Inspired by my friend Margaret, who makes lovely felt, I got up this morning and decided to make some felt.
I wanted to make a piece with colours to represent air, that I could then embroider into, so I gathered some white, grey and pale blue wool and silk, and some white Angelina.
Using Jane Doe's felting tute from Craftster (http://www.craftster.org/forum/index.php?topic=56350.0), I worked onto a cut open carrier bag, then a big sheet of bubblewrap, and wrapped it up in one of my bamboo place mats.
I started with a full layer of white, then one of grey-blue, then a mixed layer of white, the silks, Angelina and blues, then I added more wool over the silk and Angelina to make sure they'd incorporate fully.
I felted away, to the musical accompaniments of Lost Prophets*, turning my work, until I had a good solid felt, probably about 10-15 minutes of rolling. Shocking the felt was fun - I wrapped it up in the place mat and whacked it on the staircase, then jumped on it on the floor.
I've now got a lovely piece of felt drying, ready to start stitching into.
Some things to bear in mind next time:
* the silk incorporated well by itself, so next time I'll try it without wool on top, as it has become somewhat buried.
* the kitchen worktop was a good height to work onto, but a bit slippery for rolling the placemat onto, so I laid it onto a cork surface protector, which did the job.
* it worked best when the placemat was rolled away from me, so that the roll stayed together.
Now, I'm going to do a few more. I want to try green, red and purple ones.
Wheeeeee!
* We Are Godzilla, You Are Japan ( http://youtu.be/oxxpm3agRfA) is awesome felting music!


I also attended Christine Plummer's Little Treasures workshop, which was a fun session experimenting with lovely coloured papers and tags (painted with brusho), organza, buttons and machine stitching.
While I was aware that you could stitch on paper, I'd not experimented with the technique, and so it was good for getting ideas flowing. I also think I could modify this technique to use with my 7 and 5 year old nieces.


Still having a marvellous time here at the Fashion, Embroidery and Stitch show. This afternoon I was lucky enough to be able to take part in a silk shading workshop with Katie Pirson, who I happen to know from my teenage years as a lighting techie, but hadn't seen since.
The workshop was excellent, and Katie is a brilliant teacher, very understanding and gives marvellous explanations.
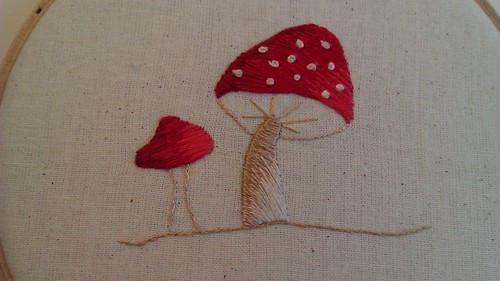
We had a kit containing lovely linen with a mushroom design drawn on it, Madeira thread and very clear instructions. Katie took us through building up the layers in soft shading, with the very important point that your stitches need to be longer than you think, to allow for later rows of stitches to be fully incorporated.
I'm really looking forward to finishing my mushroom -thanks Katie!
(the picture of the finished mushroom is Katie's one -I'm not that good/speedy)


Having a lovely time with mum at the Fashion, Embroidery and Stitch, Hobbycrafts and Sewing for Pleasure shows.
I went to a workshop with Kim Thittichai, where she taught us to layer painted newspaper, bondaweb and Mica flakes to make gorgeous pieces, which we backed onto heavyweight pelmet Vilene, and cut into shapes, ready to make brooches. Inexpensive supplies, a great outcome, and fun. Recipe for success!


